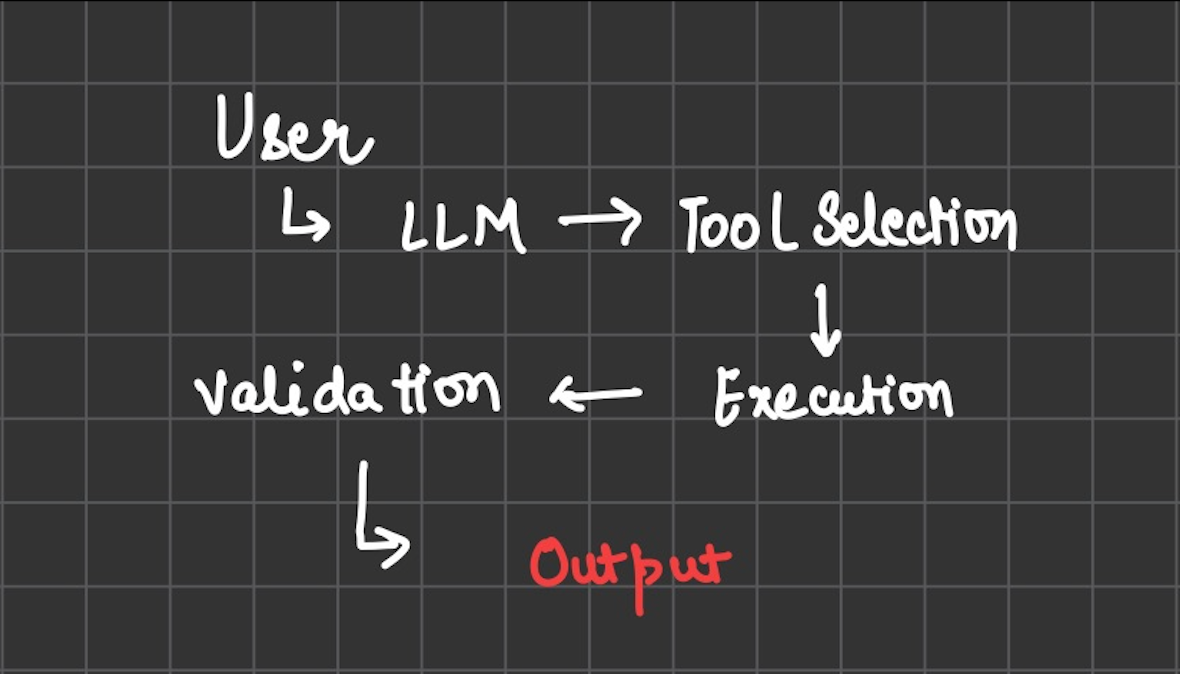
Introduction
In the previous blog SAP BTP – APIM – Demystified: Designing a Single API Proxy with Dynamic Routing for Multiple Targets where I explained the way where one API Proxy endpoint can routing the messages for mutiple targets endpoins, in this case Iflows in SAP CPI for one specific package.
I could not present a clear view how to monitoring those messages clearly in the dashboard, so the intention of this blog is present how to create the custom dimension, how to setup the statistic collector policies and the result in the custom dashboard SAP APIM.
However, centralizing traffic often creates a visibility vacuum. This point was raised by @MateuszPiotrowski , I didn’t add in previous blog because was too large already.
The “Invisible Traffic” – Challenge of MegaProxy
When some of distinct business processes (iFlows) share a single API Proxy from the same CPI Package, standard analytics become a “black box.” In the default dashboard, all traffic appears under the same Proxy name.
In this post, we will bridge this gap. I will demonstrate how to implement using JavaScript and the Statistics Collector policy, we will “unmask” the Mega-Proxy traffic, providing full transparency directly within the SAP APIM Analytics Dashboard.
The Strategy – Mapping the iflows with Javascript
To solve the “visibility vacuum,” we must capture the iFlow’s identity the moment the request hits the Proxy.
API MegaProxy – ProxyEndpoint routing:
Figure 1 – Routing based on proxy.pathsuffix
Target Endpoints:
Figure 2 – One API Proxy and mutiples Targets Endpoint.
The JavaScript Logic: The Metadata Translator
Instead of manual mapping, we utilize a centralized JavaScript policy in the PreFlow. This script acts as our “Metadata Translator”: it inspects the proxy.pathsuffix (the incoming URL) and injects the iflows name variables.
Than in each of target endpoint you need to add the java script below plus the policy Statistic Collector.
function setCustomHeaders(){
var path = context.getVariable(“proxy.pathsuffix”);
var packageName = “sap.scn.package”;
var iflowName = “Unknown Iflow”;
// Lógica de mapeamento dinâmico
if (path.indexOf(“/http/cpi/methoddelete”) > -1) {
iflowName = “Iflow.Template.MethodDelete”;
}
else if (path.indexOf(“/http/cpi/methodget”) > -1) {
iflowName = “Iflow.Template.MethodGet”;
}
else if (path.indexOf(“/http/cpi/methodpost”) > -1) {
iflowName = “Iflow.Template.MethodPost”;
}
else if (path.indexOf(“/http/cpi/methodput”) > -1) {
iflowName = “Iflow.Template.MethodPut”;
}
// Create variables
context.setVariable(“custom.package_name”, packageName);
context.setVariable(“custom.iflow_name”, iflowName);
}
Custom Metrics Setup:
Recorded data is only useful if it can be visualized. You must prepare the ground in the Analytics portal before the policy can successfully register data:
Navigate to Analyze > Settings > Custom Metrics/Dimensions.Add a new dimension named sapcpiIflow.Expert Insight: SAP will prefix these fields as custom_sapcpiIflow. This is the exact name you will reference in your policy and search for in your reports.
Figure 3 – Create the dimension custom to be used in the Policy
Policy Statistic Collector:
As you can see in the tag Statistic reffering to custom_sapcpiIflow with the reference of custom.iflow_name created by the javascript above as sample.
<Statistic name=’custom_sapcpiIflow‘ ref=’custom.iflow_name‘ type=’string’>0</Statistic>
<!–Specify Stats collector policy to add custom dimensions and measures –><StatisticsCollector xmlns=”http://www.sap.com/apimgmt” async=”false” continueOnError=”false” enabled=”true”>
<Statistics>
<!– prepopulated template –>
<!– Uncomment Statistic which needs to be collected and define reference variable–>
<Statistic name=’custom_sapcpiIflow’ ref=’custom.iflow_name’ type=’string’>0</Statistic>
</Statistics>
</StatisticsCollector>
Add in seguency:
Figure 4 – Those policies should be addded in all targetEndpoint PRE-FLOW
The Result:
Once this configuration is live, you move from a generic chart to a Business Iflow Dashboard. You can now generate
Volume Tracking: Exactly how many calls are being processed by iFlow A vs. iFlow B or C?Targeted Performance: Which specific iFlow endpoint is experiencing high latency?Error Granularity: Which iFlow is generating the most errors? Instead of seeing “Proxy Errors,” you can pinpoint which specific backend integration is failing
Image – 5 – Custom Dashboard monitoring SAP APIM
Image 6 – CPI Iflows
Update 21/01/2026 – Custom Sender System Indentification:
Now let’s suppose the scenario where the megaproxy endpoint (/megaproxy) the extra path (/http/cpi/X) can be shared across multiple sender systems, how to indentify the sender and which Iflows runs ?
In this case is the same principal add the custom header, read the custom header, set it in the variable, add in the Statistic Collector:
Custom header – Postman:
Add in java script:
var sourceSystem = context.getVariable(“request.header.X-Sender-ID”);
Set the variable custom:
context.setVariable(“custom.senderid”, senderid);
Statistic Collector add this line:
<Statistic name=’custom_senderid’ ref=’custom.senderid’ type=’string’>0</Statistic>
Than in the monitoring now you can see the sender system:
Image 7 – Indentifier of Sender System
Image 8 – Indentifier of Sender System – DataForge – and which Iflow endpoint
Image 9 – Indentifier of Sender System – Coke – and which Iflow endpoint
Conclusion:
The Mega-API-Proxy evolves from a routing mechanism based on url path into a centralized monitoring layer, a single API Proxy endpoint, you gain full visibility of all routed iFlows in one consolidated chart—making it possible to check execution Iflows and understand traffic behavior erros and proxy erros.
Kind regards,
Viana.
IntroductionIn the previous blog SAP BTP – APIM – Demystified: Designing a Single API Proxy with Dynamic Routing for Multiple Targets where I explained the way where one API Proxy endpoint can routing the messages for mutiple targets endpoins, in this case Iflows in SAP CPI for one specific package.I could not present a clear view how to monitoring those messages clearly in the dashboard, so the intention of this blog is present how to create the custom dimension, how to setup the statistic collector policies and the result in the custom dashboard SAP APIM.However, centralizing traffic often creates a visibility vacuum. This point was raised by @MateuszPiotrowski , I didn’t add in previous blog because was too large already.The “Invisible Traffic” – Challenge of MegaProxyWhen some of distinct business processes (iFlows) share a single API Proxy from the same CPI Package, standard analytics become a “black box.” In the default dashboard, all traffic appears under the same Proxy name. In this post, we will bridge this gap. I will demonstrate how to implement using JavaScript and the Statistics Collector policy, we will “unmask” the Mega-Proxy traffic, providing full transparency directly within the SAP APIM Analytics Dashboard.The Strategy – Mapping the iflows with JavascriptTo solve the “visibility vacuum,” we must capture the iFlow’s identity the moment the request hits the Proxy.API MegaProxy – ProxyEndpoint routing:Figure 1 – Routing based on proxy.pathsuffixTarget Endpoints:Figure 2 – One API Proxy and mutiples Targets Endpoint.The JavaScript Logic: The Metadata TranslatorInstead of manual mapping, we utilize a centralized JavaScript policy in the PreFlow. This script acts as our “Metadata Translator”: it inspects the proxy.pathsuffix (the incoming URL) and injects the iflows name variables.Than in each of target endpoint you need to add the java script below plus the policy Statistic Collector. function setCustomHeaders(){
var path = context.getVariable(“proxy.pathsuffix”);
var packageName = “sap.scn.package”;
var iflowName = “Unknown Iflow”;
// Lógica de mapeamento dinâmico
if (path.indexOf(“/http/cpi/methoddelete”) > -1) {
iflowName = “Iflow.Template.MethodDelete”;
}
else if (path.indexOf(“/http/cpi/methodget”) > -1) {
iflowName = “Iflow.Template.MethodGet”;
}
else if (path.indexOf(“/http/cpi/methodpost”) > -1) {
iflowName = “Iflow.Template.MethodPost”;
}
else if (path.indexOf(“/http/cpi/methodput”) > -1) {
iflowName = “Iflow.Template.MethodPut”;
}
// Create variables
context.setVariable(“custom.package_name”, packageName);
context.setVariable(“custom.iflow_name”, iflowName);
} Custom Metrics Setup:Recorded data is only useful if it can be visualized. You must prepare the ground in the Analytics portal before the policy can successfully register data:Navigate to Analyze > Settings > Custom Metrics/Dimensions.Add a new dimension named sapcpiIflow.Expert Insight: SAP will prefix these fields as custom_sapcpiIflow. This is the exact name you will reference in your policy and search for in your reports.Figure 3 – Create the dimension custom to be used in the PolicyPolicy Statistic Collector:As you can see in the tag Statistic reffering to custom_sapcpiIflow with the reference of custom.iflow_name created by the javascript above as sample.<Statistic name=’custom_sapcpiIflow’ ref=’custom.iflow_name’ type=’string’>0</Statistic> <!–Specify Stats collector policy to add custom dimensions and measures –><StatisticsCollector xmlns=”http://www.sap.com/apimgmt” async=”false” continueOnError=”false” enabled=”true”>
<Statistics>
<!– prepopulated template –>
<!– Uncomment Statistic which needs to be collected and define reference variable–>
<Statistic name=’custom_sapcpiIflow’ ref=’custom.iflow_name’ type=’string’>0</Statistic>
</Statistics>
</StatisticsCollector> Add in seguency:Figure 4 – Those policies should be addded in all targetEndpoint PRE-FLOWThe Result:Once this configuration is live, you move from a generic chart to a Business Iflow Dashboard. You can now generateVolume Tracking: Exactly how many calls are being processed by iFlow A vs. iFlow B or C?Targeted Performance: Which specific iFlow endpoint is experiencing high latency?Error Granularity: Which iFlow is generating the most errors? Instead of seeing “Proxy Errors,” you can pinpoint which specific backend integration is failingImage – 5 – Custom Dashboard monitoring SAP APIMImage 6 – CPI IflowsUpdate 21/01/2026 – Custom Sender System Indentification:Now let’s suppose the scenario where the megaproxy endpoint (/megaproxy) the extra path (/http/cpi/X) can be shared across multiple sender systems, how to indentify the sender and which Iflows runs ?In this case is the same principal add the custom header, read the custom header, set it in the variable, add in the Statistic Collector:Custom header – Postman:Add in java script:var sourceSystem = context.getVariable(“request.header.X-Sender-ID”);Set the variable custom:context.setVariable(“custom.senderid”, senderid);Statistic Collector add this line:<Statistic name=’custom_senderid’ ref=’custom.senderid’ type=’string’>0</Statistic>Than in the monitoring now you can see the sender system: Image 7 – Indentifier of Sender SystemImage 8 – Indentifier of Sender System – DataForge – and which Iflow endpointImage 9 – Indentifier of Sender System – Coke – and which Iflow endpointConclusion:The Mega-API-Proxy evolves from a routing mechanism based on url path into a centralized monitoring layer, a single API Proxy endpoint, you gain full visibility of all routed iFlows in one consolidated chart—making it possible to check execution Iflows and understand traffic behavior erros and proxy erros.Kind regards,Viana. Read More Technology Blog Posts by Members articles
#SAP
#SAPTechnologyblog